
New Customer Onboarding
Set Your New Customers Up For Oily Success!
Set your personally enrolled customers up for success from day one with automated texts and emails that educate, support, and build trust—so they fall in love with their new lifestyle (and keep coming back!
Effortless Text Tips: Encourages your customers to subscribe to your weekly text tips (or monthly email tips) to keep oils, and purchase ideas at the forefront of their minds!
Tailored Class Access: Shares trigger words to the DM classes strategically to guide new customers toward the content that aligns with their goals., ensuring customers receive information tailored to their individual needs.
Fosters a personalized learning experience through text classes giving direct access to ask you questions and start a conversation about the material.
Empower with Resources: Empowers customers with the knowledge and resources to thrive on their wellness journey using Young living oils.
Build a Community of Wellness: Encourages your customers to join your community of oilers. Connects them with your supportive community where they can share experiences, ask questions, and find inspiration.
The perfect solution to inspire success with oils, Thieves products, Ningxia, and a Young Living Lifestyle utilizing automated Text AND Email Marketing!
The Email Folder:
Onboarding | New Customer
Head to the MARKETING TAB and select EMAIL TEMPLATES from the top drop down
There are 4 email templates full of recipes geared toward the Make-a-Shift Kits and valuable oily 101 PLUS a place for your team resources
All emails already include:
A “hook” subject line and preview text
to get your email noticed
Your 'custom values email' and 'custom-values from name', so they are entirely ready to send at import
If you haven’t linked your email yet,
do that now!
See below for the EMAIL TEMPLATE SET UP NEEDED prior to using this workflow!


The Workflow:
PLUS What to Set Up
Welcome Text: Update the custom values name to the name your contacts know you best by.
Welcome Email Add your group link
Email Two: Support Call *Add your calendar link
Email Three: Oil Books + Supplies
Email Four: LR/ER and Ditch & Switch
Text Two: Class Options + Trigger Words
Before You Begin Onboarding:
Head to These Two Email Templates and Set Up:
Email One: You will plug in your team Facebook group (or community link)
Email Two: You will add your Calendar link (for Leaders and Mentors Plan Subscribers) into the Book-a-Call button
*You will delete the Book-a-Call button if you do not have a Leader or Mentor Subscription Plan. (There is still a call to action in the email body to reply and schedule a call!
Leader and Mentor Plan Subscribers use this lesson: Set Up Your Booking Calendar
You can edit any of the text/graphics in each email and they will automatically sync with your New Customer Onboarding workflow so you can seamlessly start onboarding your New Customers monthly after your templates have been set up!
Save your templates after editing!
Lesson: Personalize the Content
Update Your Group and Call Link Step-by-Step:
Step One: Find The Email Templates

Head to the Marketing Tab
Select Email Templates from the Email dropdown
Select The New Customer Onboarding
Step Two: Add Your Group Link

Click open 01: Version Two | New Customer Onboarding
Highlight the Join Our Community Text
Click on the Link Icon in the top menu and add your Facebook group link
Step Three: Add Your Group to the Graphic

In Email One: Click the Photo Element for the 'Join our Wellness Community' graphic
Add your Facebook group link on the editing side of the email under "link to"
OPTIONAL: Swap out the Wellness Community graphic with a team graphic
Step Four: Add Your Book-a-Call Page

Click in 02: Version 2 | New Customer Onboarding
Select the Button Element
Delete the button if you have a Builder Plan
Add your Book a Call webpage if you have a Leader or Mentor Plan
Lesson to integrating your calendar here.
OPTIONAL Set Up for Your Onboarding:
Personalizing your email templates with your banner and signature builds trust, reinforces your brand, and helps your team feel more connected and supported every time they hear from you.
Add a Signature Graphic

Drag in a photo element (top for header, bottom for signature)
Click the pencil to upload your Email Signature
Select the disk icon on the photo element and save the signature
Drag in your brand saved elements into the rest of the Onboarding Emails
Update Your Name in the Welcome Text

Head to the Automations Tab
Type "New Customer" into the search box to find the Onboarding workflow
Click on the SMS action and edit the custom values name to a name your contacts will know you by. Choose a name that your team will recognize right away to prevent being marked as spam!
Be sure to leave your name at the top and the PASS opt-out line at the bottom for text compliance
Add Loyalty Reminders to the New Customer Onboarding:

Head to the Automation Tab
Select The Onboarding New Customer SMS + Email workflow
Inside hit the + button below 'Welcome Text'
Select 'Add Contact Tag'
Select the Tag 'Loyalty Rewards' for US or 'Essential Rewards' for Canada
Save the Action
Save the entire workflow in the top right of the screen

Video Lesson: How to Set Up and Use the New Customer Onboarding
How to Add Customers to the New Customer Onboarding:
Get Your New Customers Plugged In—Automatically!
Just tag them once, and Diamond Marketing does the rest.
✨ Step 1: Run your New Customer report in your VO
✨ Step 2: When importing into DM, add the 'New Customer' tag under “advanced”
That’s it! They’ll be added to the onboarding workflow and start receiving your welcome text + email starting at noon the same day.
Step One: Virtual Office Report
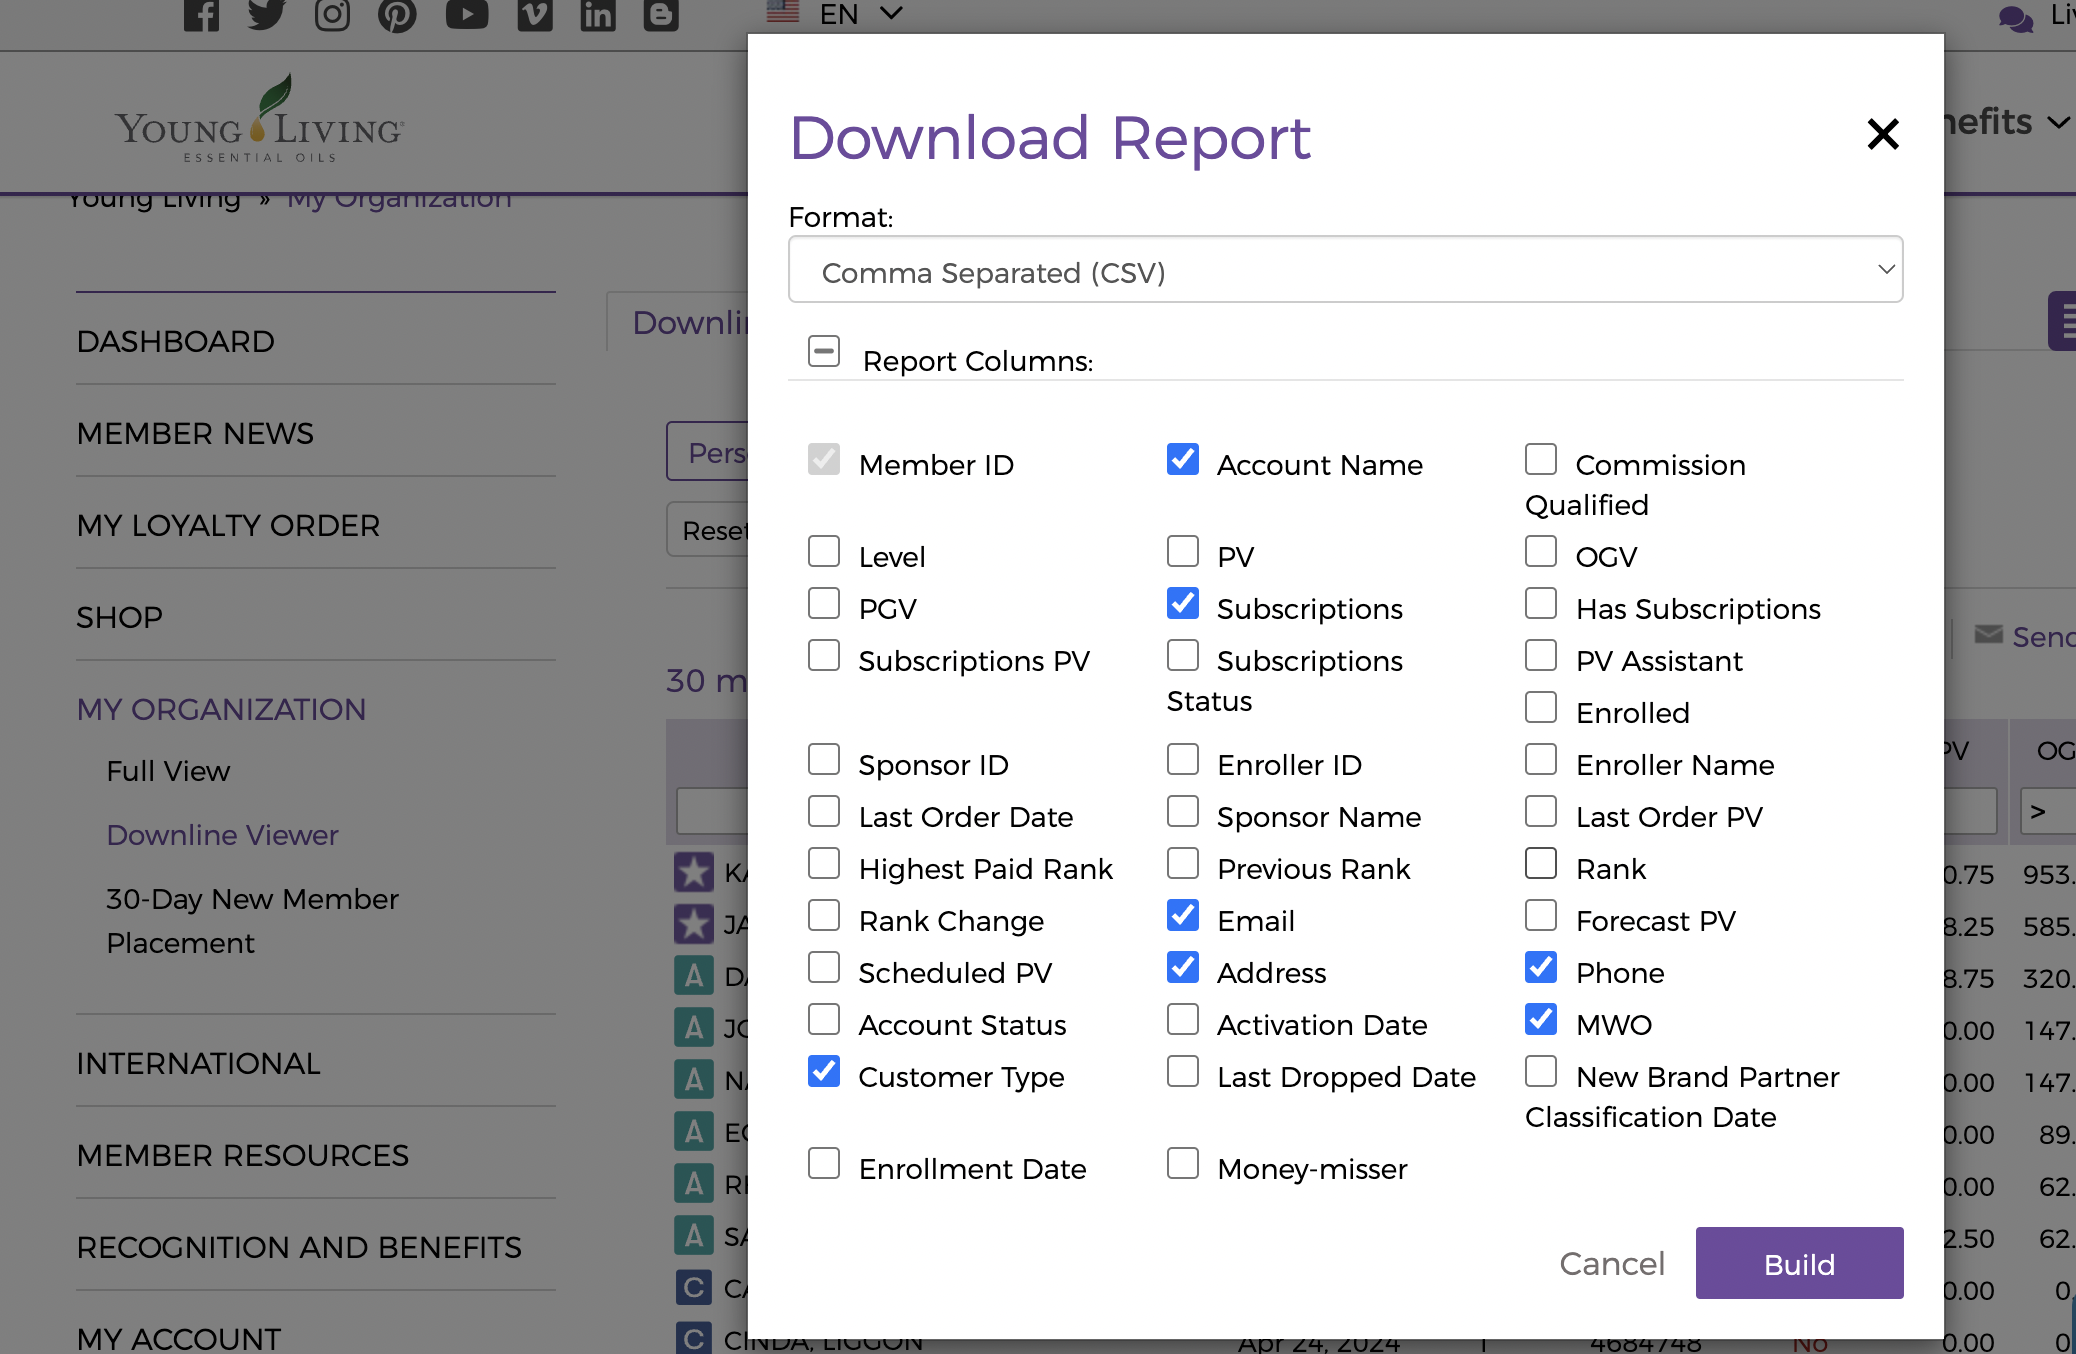
Select Personally Enrolled or New to Team and select the PREVIOUS month in the drop down for month
Include Customer Type, Account Name, Subscriptions (for Order Reminders) Email, Address, Phone and MWO
*NOTE: If you have new accounts who have not placed an order yet, filter for them in your VO next and remove them from this report before importing. You can import a New Account report and onboard them using the New Account Onboarding here.
Step Two: Import the Report
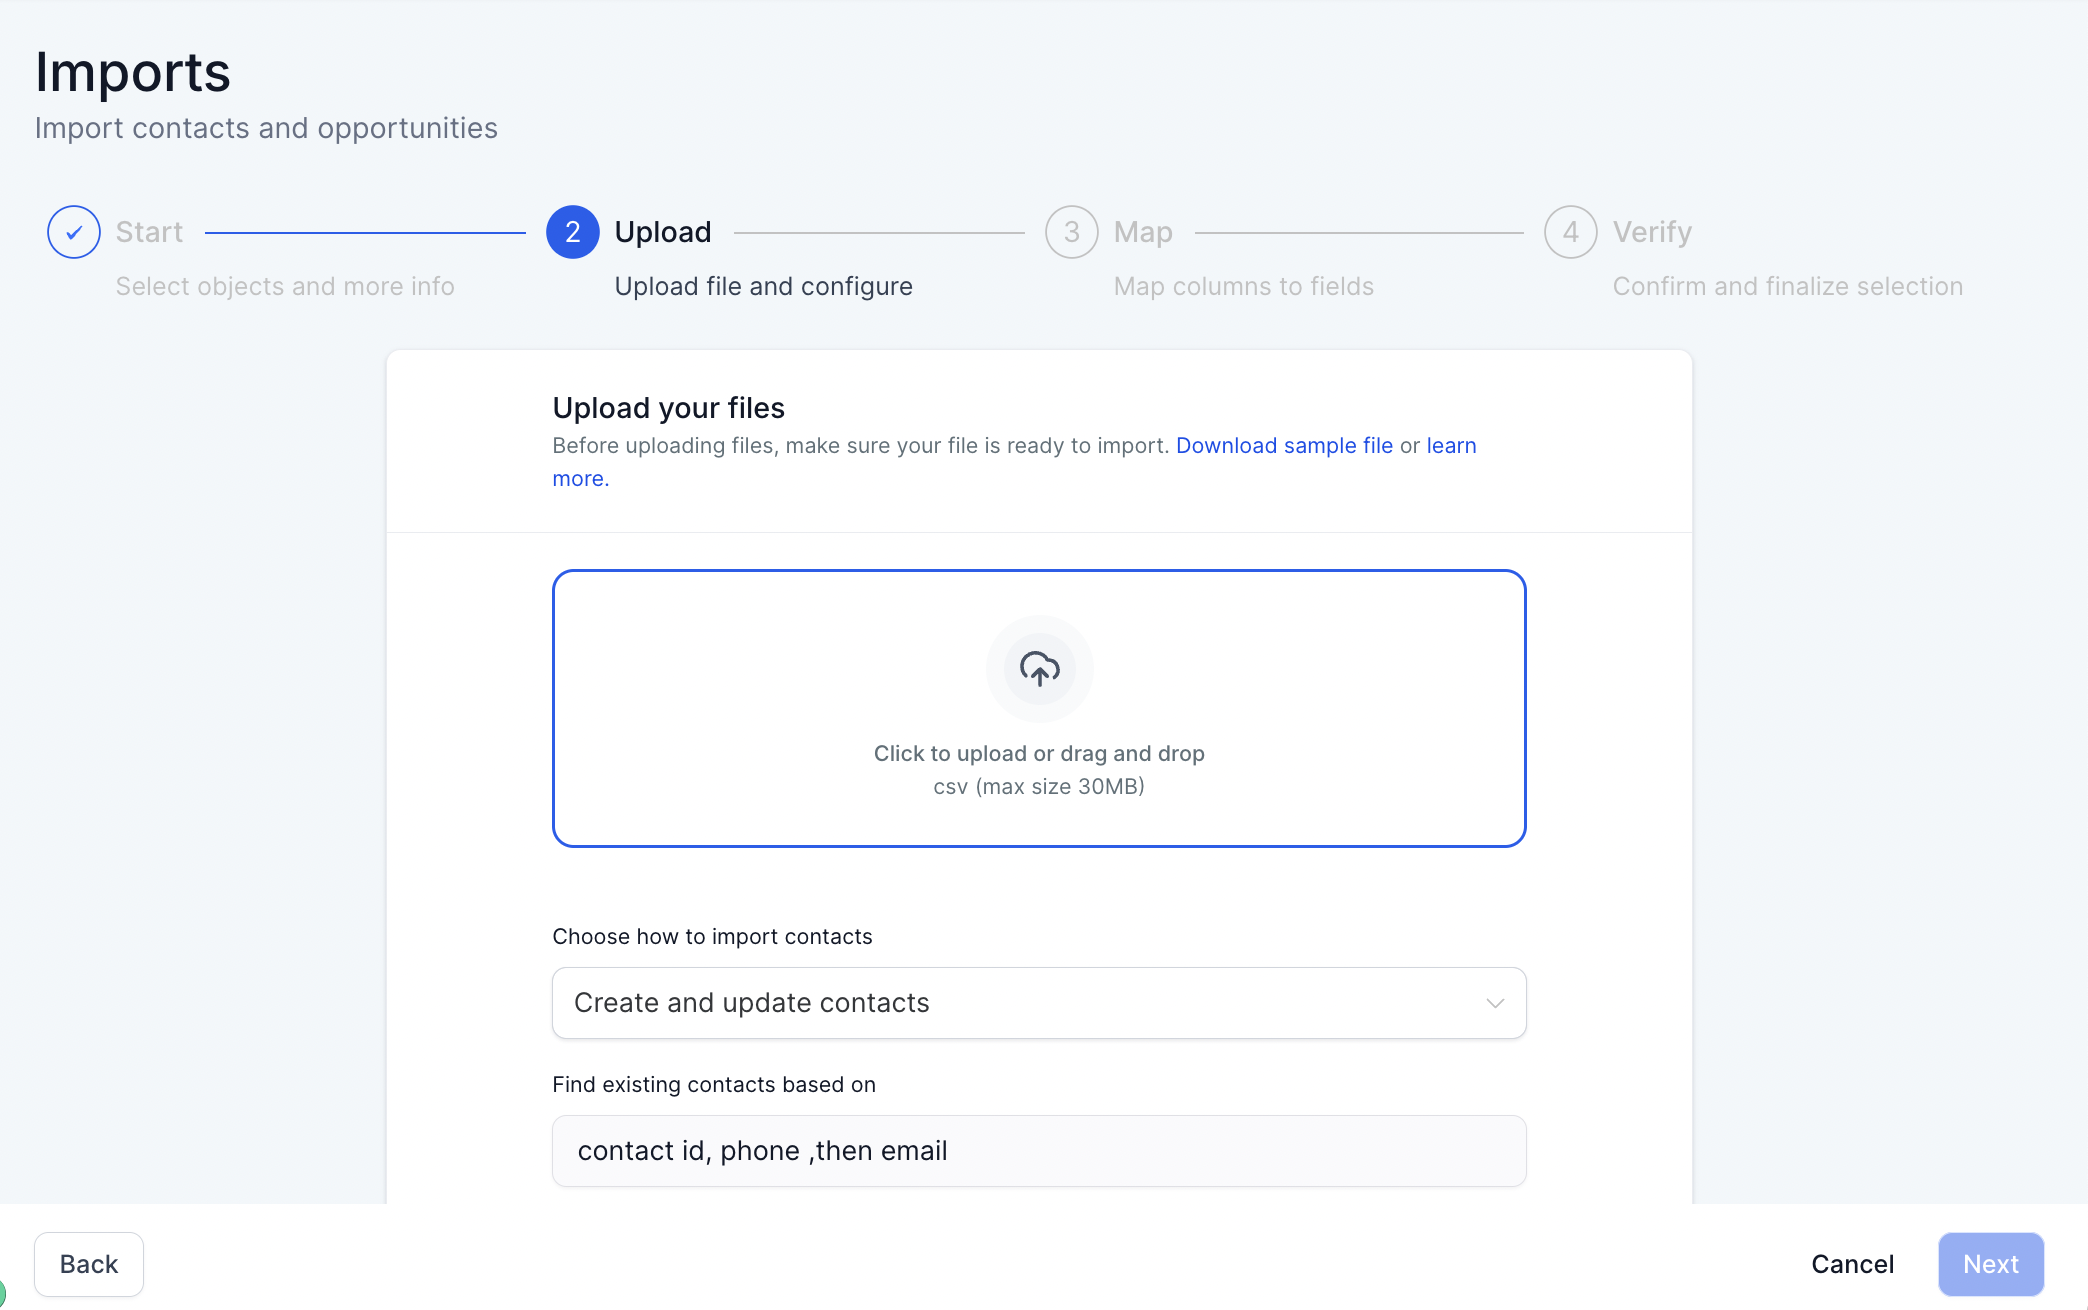
In the Contacts Tab: Select the Import Icon
Select Contacts & Upload Your File
Map the fields: Subscription will go with Process Day and Customer Type with Customer/Brand Partner
In the Verify Step of Import: Add the Tag 'Personally Enrolled' (if you pulled a PE report) to update your PE list
AND Add the tag 'New Customer' to add this report right to the New Customer Onboarding Workflow
Full lesson here

Diamond Marketing is a customer care platform design for Young Living Brand Partners. All content provided by Diamond Marketing is the property of Diamond Marketing App LLC and cannot be copied or redistributed outside of Diamond Marketing. without prior consent.