
Master Contact Management with Ease
Streamline, organize, and personalize—effortless contact management for your growing Young Living business!
Welcome to Contact Management!
Managing your contacts has never been easier! In this lesson, we’ll walk you through each step to help you organize, track, and optimize your contact list. From adding tags and workflows to customizing fields and personalizing interactions, you'll have everything you need to streamline your Young Living business. Follow along for a step-by-step guide to make the most of your contact management tools!

Manage Your Contacts with Ease in Diamond Marketing!
Keeping track of your contacts has never been easier! Our platform is designed to simplify and enhance your Young Living business by giving you complete control over your contact management.
All-in-One Contact Organization
Store and manage notes, tasks, appointments, and contact details—all in one place.
Access everything from your laptop, desktop, or theLead Connector phone app.
Tailored for Young Living
Keep track of customer preferences, wellness goals, and essential oil favorites.
Easy YL contact upload to store the YL information that matters most to you.
Effortless Tags & Workflows
Quickly add or remove tags to keep your contacts organized.
Automate communication with pre-built workflows that you can adjust them as needed.
Personalized Contact Fields
Add custom fields for preferred communication methods, notes on product interests, and more.
Our system adapts to your business—track what’s important to you!
The Contacts Tab: Your Hub for Managing Connections
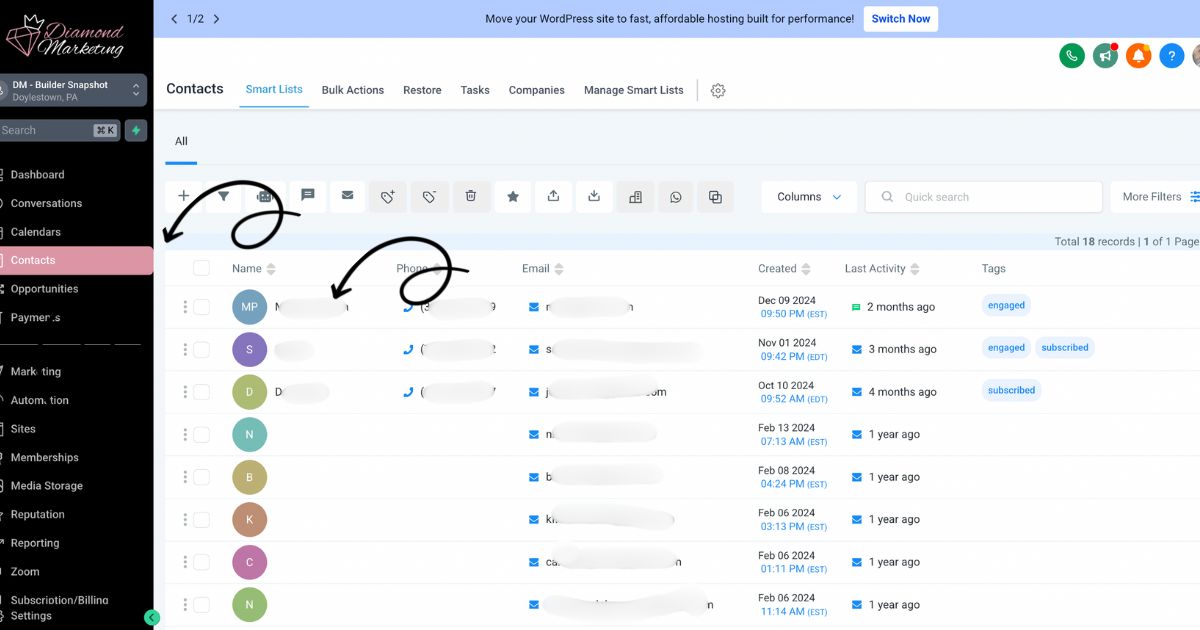
The Contacts Tab is where you can easily organize and interact with your customer list. Here’s what you can do:
View Your Contact List – Quickly access all your saved contacts in one place. Search, sort, and filter to find exactly who you need.
Import Contacts – Upload contacts in bulk to keep all your essential information in one system.
Filter for Contacts – Use filters to sort contacts by tags, engagement, workflow history, or other custom fields.
Add Contacts to a Workflow – Enroll contacts into automated workflows to ensure they receive the right education, follow-ups, and promotions.
Send a Text Blast – Instantly connect with your audience by sending updates, promotions, or reminders to multiple contacts at once.
Important Note: We do not recommend sending email blasts from the Contacts Tab. Instead, use the Marketing Tab to create email campaigns. This ensures your emails are properly formatted, tracked, and optimized with detailed statistics.
Filtering Your Contact List
Easily sort and manage your contacts in the Contacts Tab by using filters to find specific groups of people.
Click "More Filters" at the top of the contact list.
Select a filter from the available options.
Commonly used filters for YL Brand Partners include:
Tags – Engaged (opted into education), Subscribed (joined your email list), New Customer, New Account, Brand Partner, Downline, Personally Enrolled.
Custom Values – Address (City), Customer Type (Customer/Brand Partner).
MWO (Months Without Order) – Identify contacts who haven't placed an order recently.
Workflows – Filter contacts who have completed or are currently in a specific workflow.
Creating Smartlists
Easily sort and manage your contacts in the Contacts Tab by using filters to find specific groups of people.
Click "More Filters" at the top of the contact list.
Select a filter from the available options.
Commonly used filters for YL Brand Partners include:
Tags – Engaged (opted into education), Subscribed (joined your email list), New Customer, New Account, Brand Partner, Downline, Personally Enrolled.
Custom Values – Address (City), Customer Type (Customer/Brand Partner).
MWO (Months Without Order) – Identify contacts who haven't placed an order recently.
Workflows – Filter contacts who have completed or are currently in a specific workflow.
Create a Newsletter Smart List
The Individual Contact Hub: Everything You Need in One Place
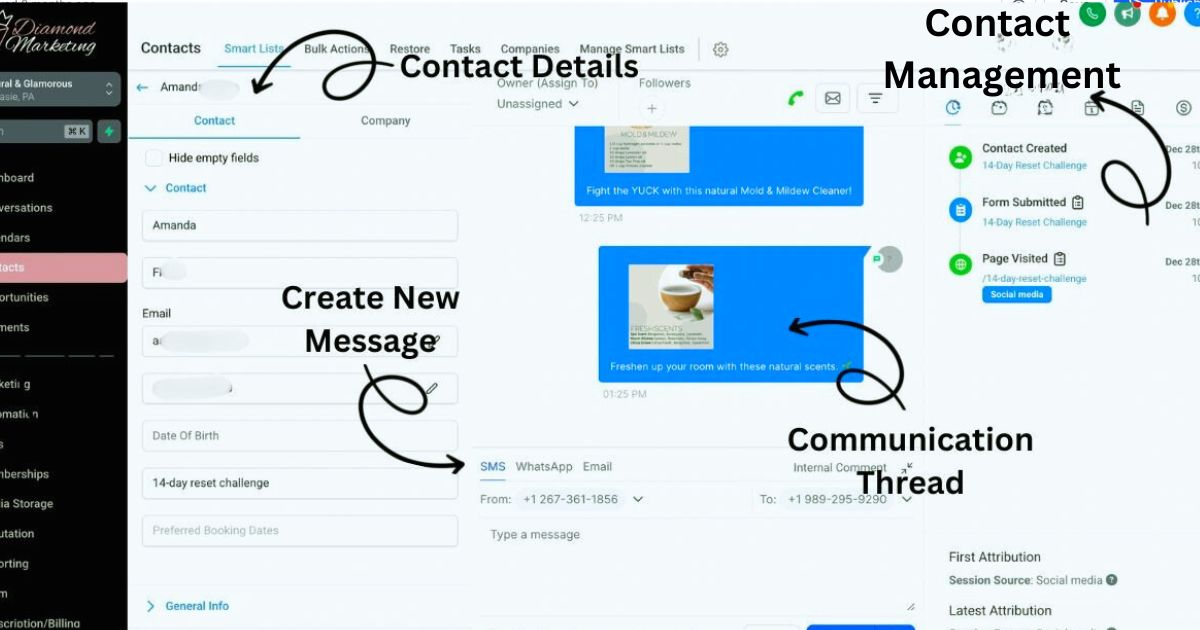
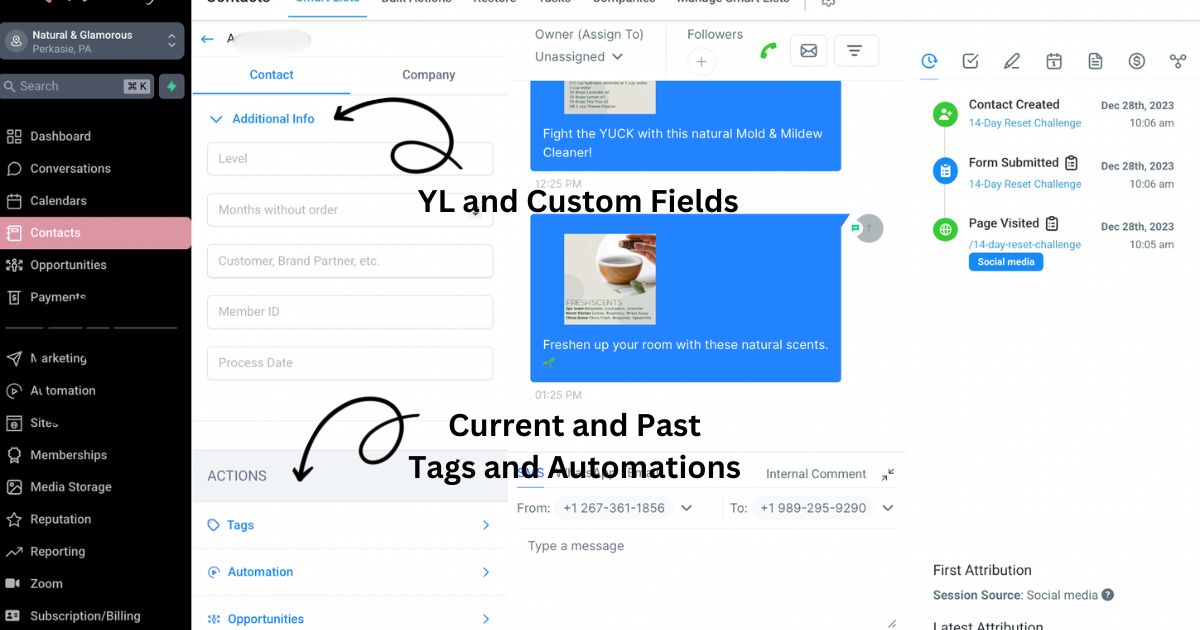
When you click on a contact's name from the Contacts Screen, Conversations Screen, or within the Lead Connector App, the
Individual Contact Hub will open. This is where you can manage all interactions and details for each contact. Here’s what you’ll find inside:
Contact Details – View all imported or manually added information, including name, email, phone number, tags, custom fields and workflow history (Automations).
Communication Thread – See a running history of all text and email communications with the contact, keeping every conversation in one place.
Message Creator – Send a new individual email or text message directly from the contact hub for quick, personalized outreach.
Contact Management – The Contact Management Menu provides a comprehensive view of each contact’s interactions, helping you track engagement and manage follow-ups efficiently. Track which webpages or forms the contact has interacted with, giving you insight into their engagement and interests. This is also where you can create tasks and notes for each contact to stay organized and ensure timely follow-ups.
Adding and Deleting Tags on Individual Contacts
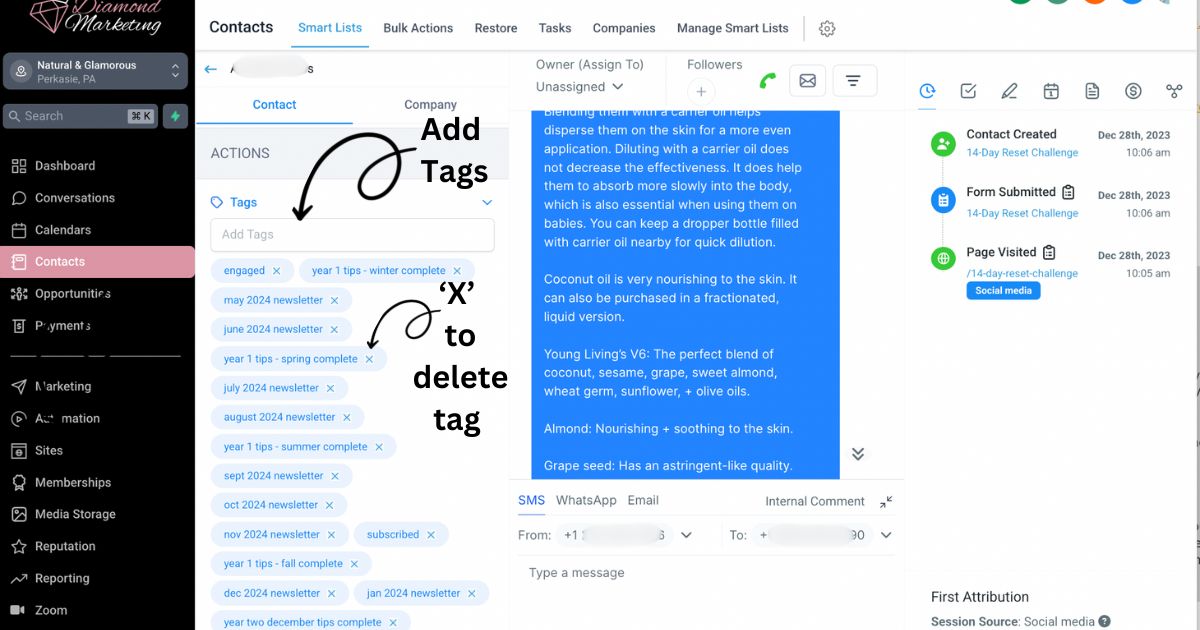
Tags help you categorize and organize your contacts based on preferences, engagement, or any other criteria you choose. Here’s how to add or remove tags within an individual contact’s profile.
How to Add or Remove Tags:
Navigate to the Individual Contact Hub by clicking on a contact’s name.
Scroll down to the Tags section.
Click the dropdown to view existing tags.
To add a tag, type the tag name in the box and press enter.
To remove a tag, click the X next to the tag.
Navigate to the Individual Contact Hub by clicking on a contact’s name.
Scroll down to the Tags section.
Click the dropdown to view existing tags.
To add a tag, type the tag name in the box and press enter.
To remove a tag, click the X next to the tag.
Important Note: If a tag you removed triggers a workflow, simply removing the tag will not remove the contact from that workflow. You will also need to manually remove them from the workflow
to ensure they are no longer receiving related messages.
Adding and Removing Individual Workflows
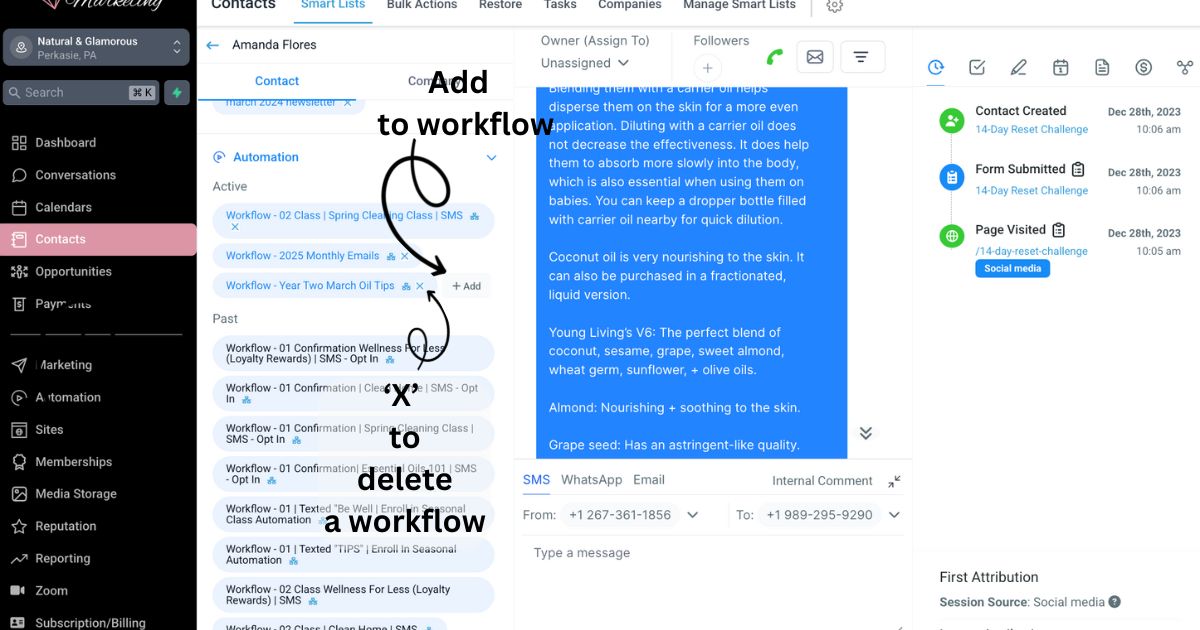
Workflows automate messaging and engagement for your contacts. You can manually add or remove a contact from a workflow at any time through the
Individual Contact Hub
.
How to Add a Contact to a Workflow:
Navigate to the Individual Contact Hub
by clicking on the contact’s name.
Scroll to the Automations section.
Click the dropdown to view the contact’s current and past workflows.
Click the +Add button to manually add them to a new workflow.
Select the CONFIRMATION workflow for the class if available.
Each class has two workflows:
CONFIRMATION– Sends a welcome message.
CLASS– Delivers the class content.
How to Remove a Contact from a Workflow:
In the Automations section, locate the workflow you want to remove.
Click the X next to the workflow name to delete it.
Viewing and Editing DND (Do Not Disturb) Filters
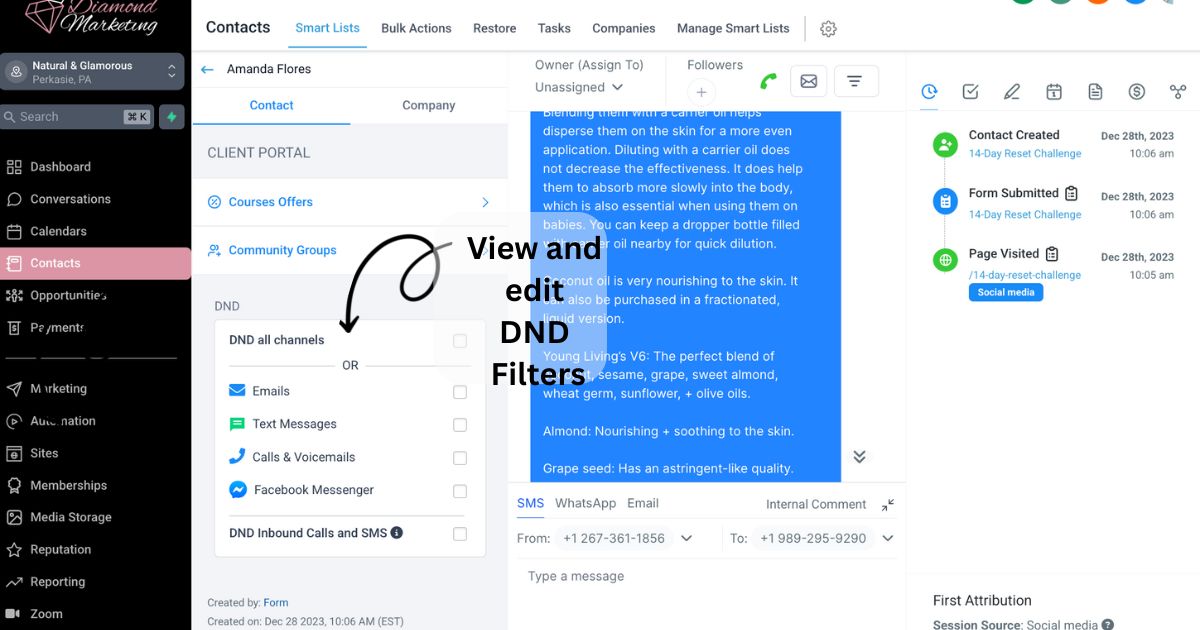
The Do Not Disturb (DND) setting prevents a contact from receiving any outbound communication through a specific channel (email or text).
How Contacts Trigger DND:
Email DND: Contacts automatically enter DND for email when they unsubscribe using the unsubscribe link in the footer of your emails.
Text Message DND: Contacts trigger DND for text by replying with STOP or PASS in a message.
How Contacts Can Resume Communication:
To opt back into text messages, contacts can reply with START at any time.
How to View & Edit DND Status:
Navigate to the Individual Contact Hub by clicking on the contact’s name.
Scroll to the DND Settings section.
Here, you can view which channels (email, text) have Do Not Disturb enabled.
To manually remove a contact from DND, update their status in the settings or advise them to opt back in using the steps above.
This ensures you’re only messaging those who want to receive your communications while staying compliant with opt-in regulations!
Using the Communication Thread in an Individual Contact
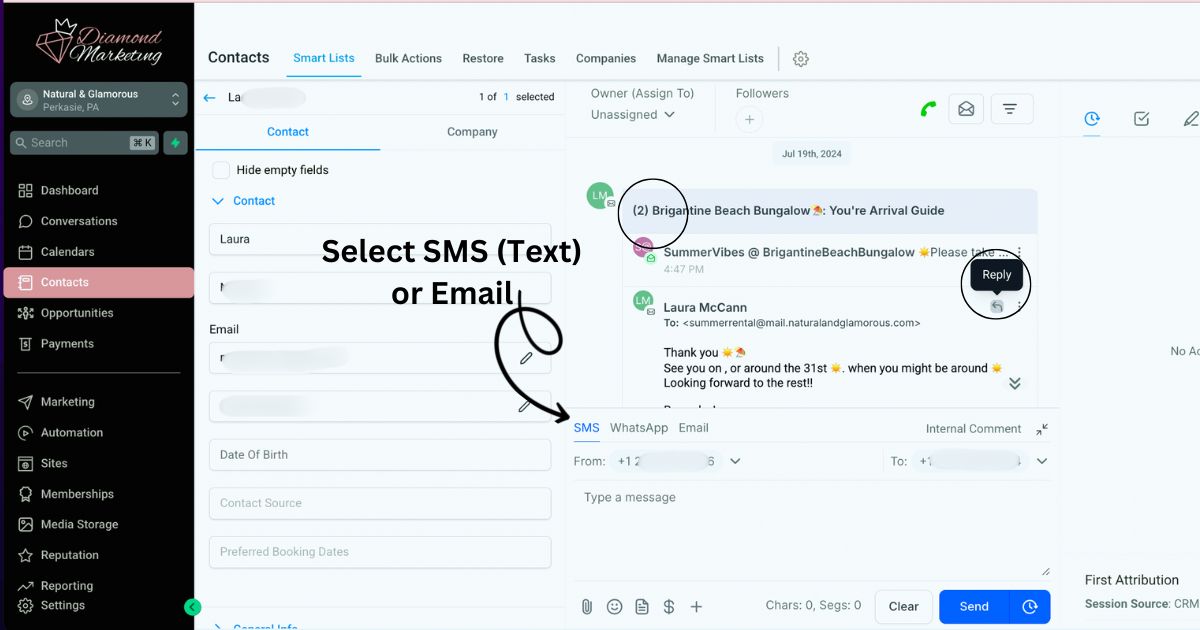
The Communication Thread is where you can view and manage all inbound and outbound interactions with an individual contact. This includes both text and email communications, making it easy to track conversations and respond efficiently.
Viewing and Replying to Messages:
Text Replies: All incoming and outgoing texts will appear in the thread.
Email Replies: When a contact replies to an email, a number badge will appear on the original email in the thread.
To reply to an email, click on the email to expand it and select the reply icon.
Creating a New Message:
Click SMS or Email to compose a message in the text box.
Use the paperclip icon to attach an image.
Click the emoji icon to add an emoji for a personal touch.
More details on using templates with the paper icon can be found below.
Inserting a Template (Snippets)
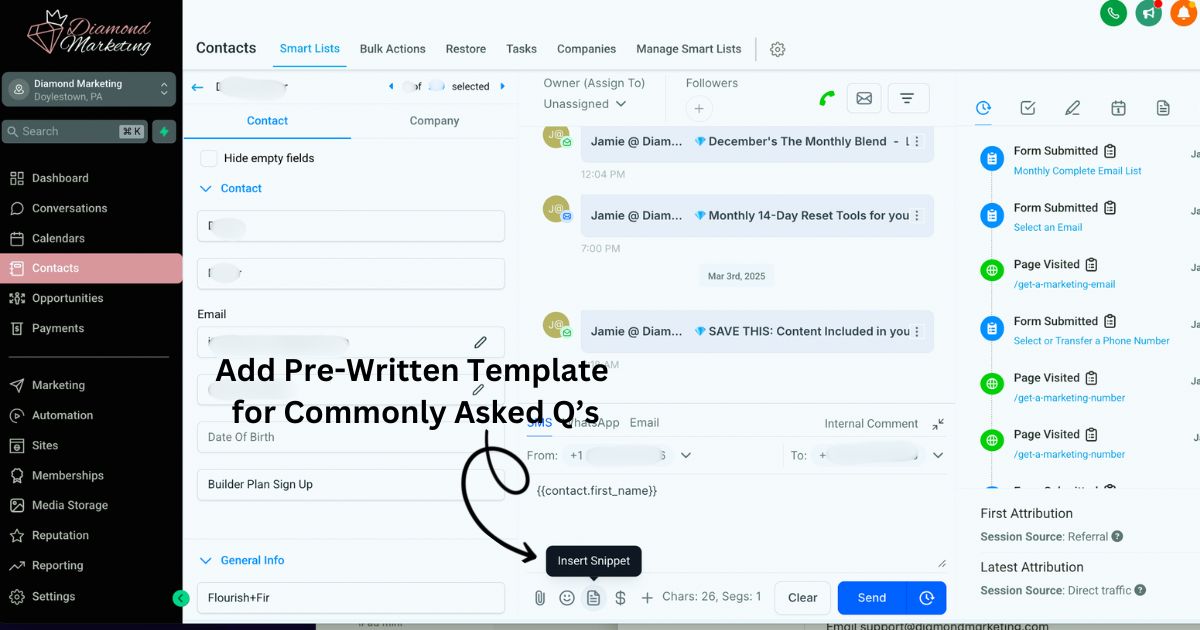
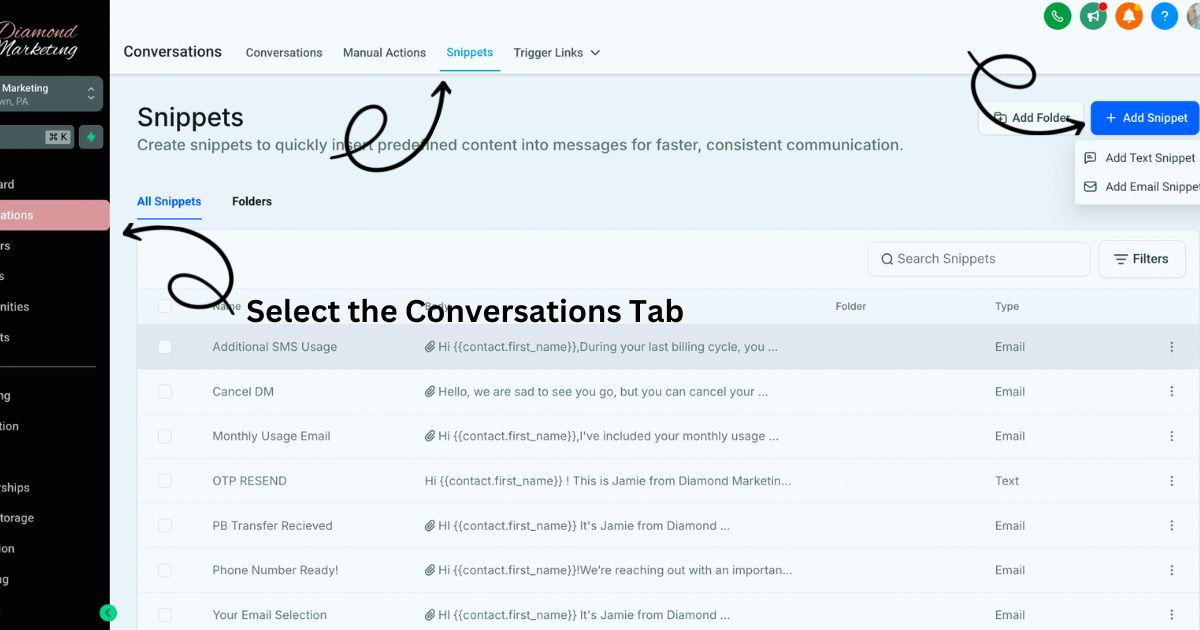
Snippets are pre-written templates that allow you to send quick, consistent messages via text or email. Using snippets saves time and ensures your communication is clear and professional.
How to Use Snippets in a Message:
Select SMS or Email communication in the Individual Contact Hub.
Click the Insert Snippet (paper icon).
Choose from your list of pre-written texts or emails to insert into the message.
Creating Your Own Snippets:
Go to the Conversations Tab.
Click Snippets from the top menu.
Select +Add Snippet and choose either Add Text Snippet or Add Email Snippet.
Create your template and save it for future use.
Snippets help streamline responses while keeping your messaging consistent and professional!
Contact Management Menu
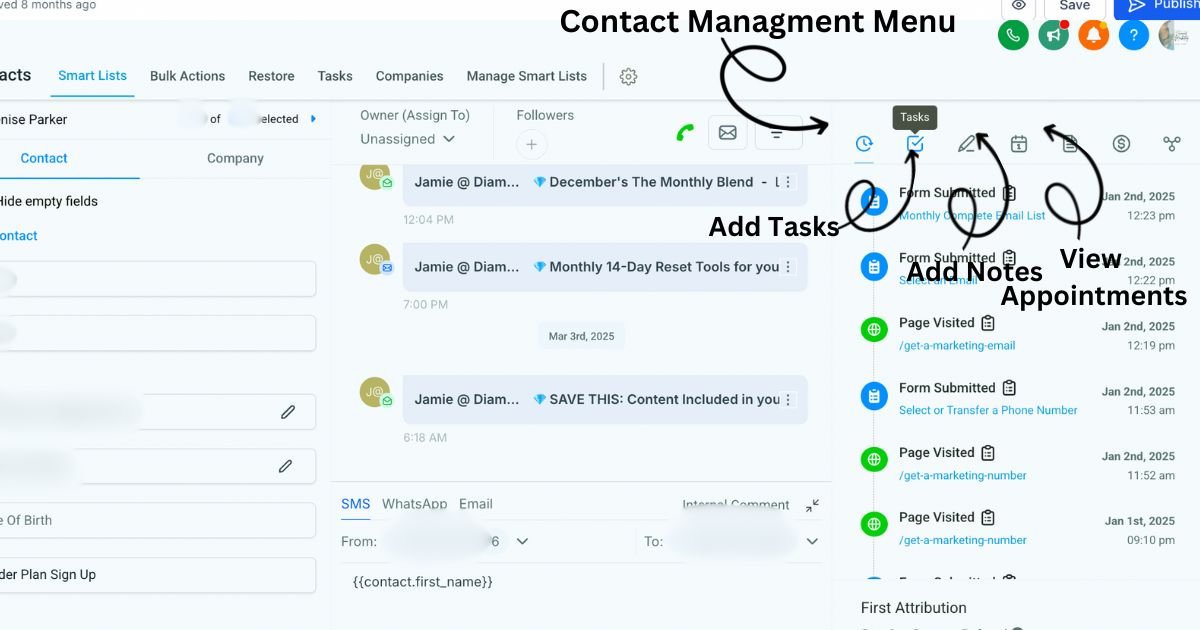
The Contact Management Menu provides a comprehensive view of each contact’s interactions, helping you track engagement and manage follow-ups efficiently.
Key Features:
Webpage & Form History: View a detailed history of web pages the contact has visited and forms they have submitted. This helps you understand their interests and engagement with your content.
Notes: Add detailed notes to document interactions, preferences, or important details about the contact. Keep track of essential information for personalized follow-ups.
Tasks: Assign tasks to yourself or your team to ensure important follow-ups and actions are completed on time. Stay organized and keep your workflow running smoothly.
Appointment Viewer: Quickly see any scheduled appointments, past or upcoming, linked to the contact. This allows for efficient scheduling and follow-ups without missing important meetings.
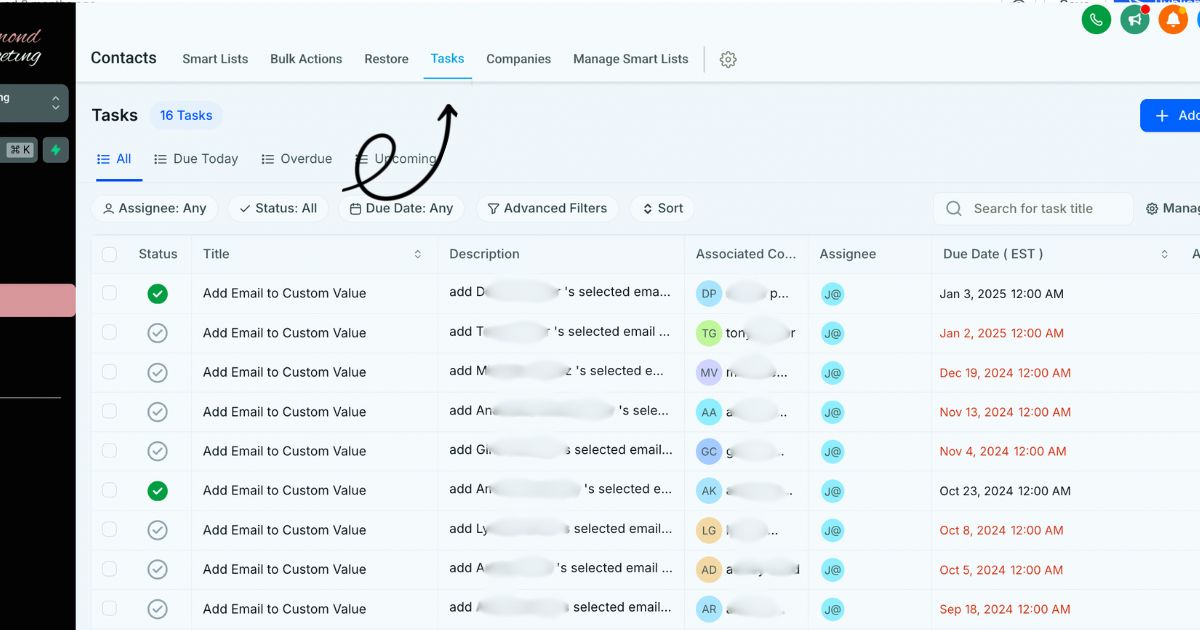
In the Contacts Tab, you can manage and track all tasks assigned to your contacts to stay on top of follow-ups and actions.
Key Features:
Add a New Task: Assign a task to yourself or your team to ensure timely follow-ups and actions.
View & Manage Tasks: See all tasks associated with an individual contact in their Contact Hub under the Tasks section.
Sort by Due Date: Navigate to the Tasks section in the Contacts Tab (top menu) to view a full list of all created tasks and sort them by due date for easy organization.
This menu ensures you have a full picture of each contact’s journey, helping you personalize communication and manage relationships effectively! The task feature helps you stay organized and never miss an important follow-up!
The Conversations Tab: Your Central Hub for Messaging
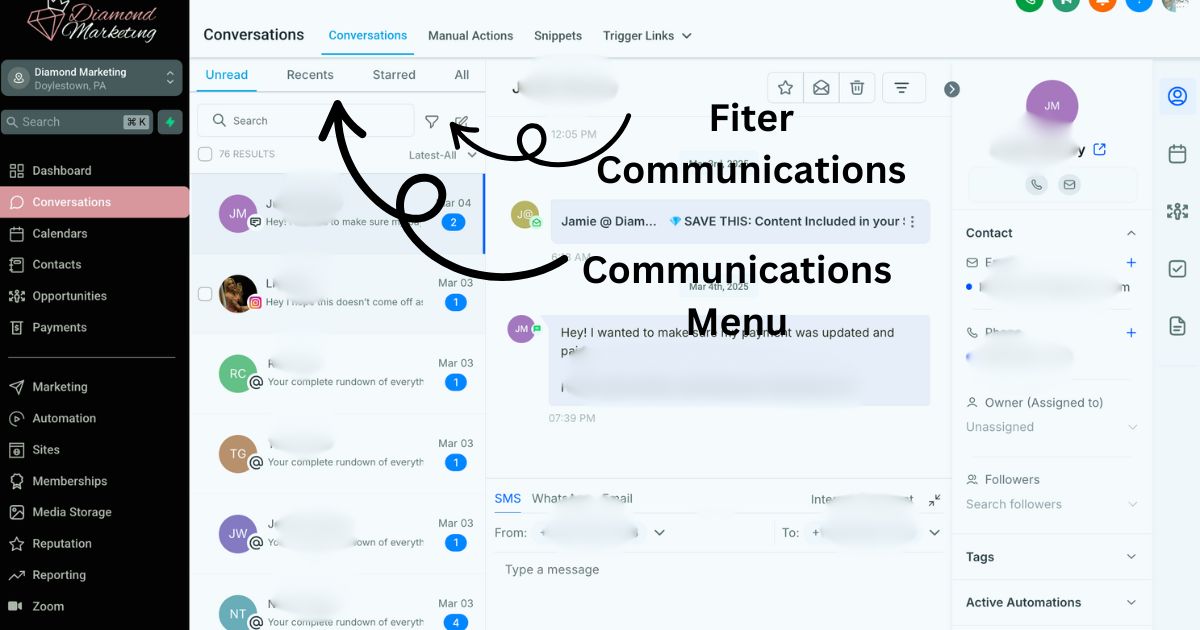
The Conversations Tab is where all outbound and inbound conversations for all contacts are located and organized, giving you a complete view of your communication history.
You can access the Conversations Hub from your portal on a laptop or desktop or from within the Lead Connector app, ensuring seamless communication management on the go.
To keep your conversations organized, you can sort them by Unread, Recent, Starred, or All
and further filter by message channel, such as text, email, or social media (when integrated). This allows you to quickly find and respond to messages, ensuring efficient and streamlined communication with your contacts.
Managing Individual Contacts from the Conversations Tab
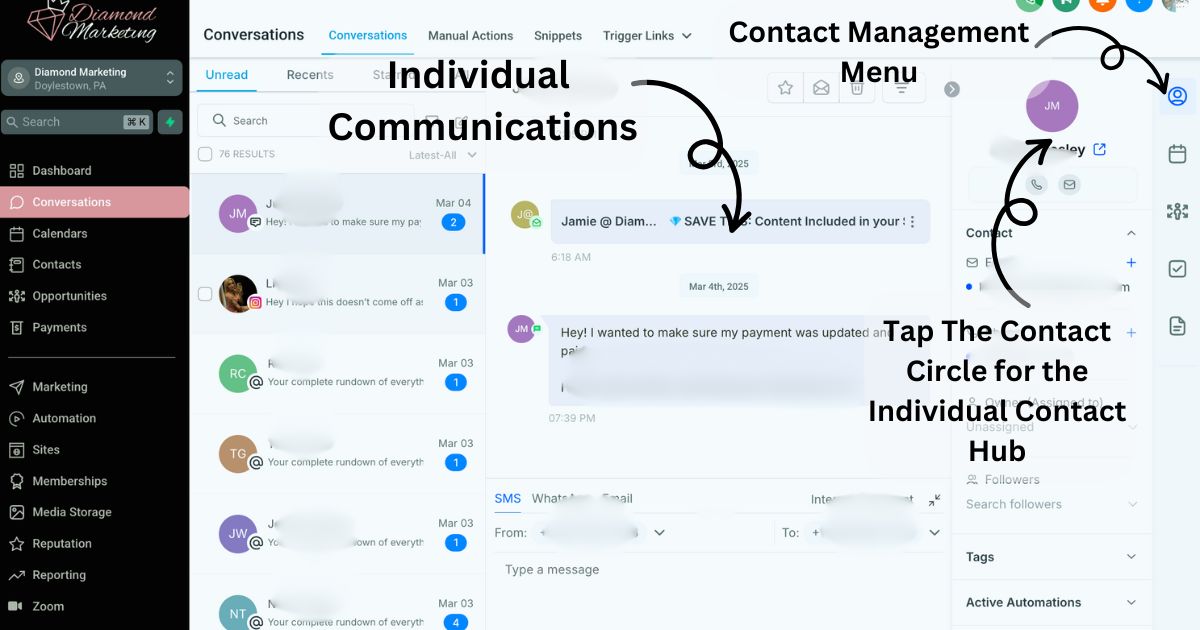
Within the Conversations Tab, you can click on an individual contact within the conversation thread to access their Individual Contact Hub. This allows you to manage and communicate with that contact directly.
After clicking an Individual, you can:
View a complete history of your text and email communications with the contact.
Send a new text or email directly from the message creator.
Access their contact details, including any tags, workflows, and notes associated with them.
Track their engagement history, such as webpages visited and forms submitted.
The Automations Tab: Manage Contacts Within Workflow Actions
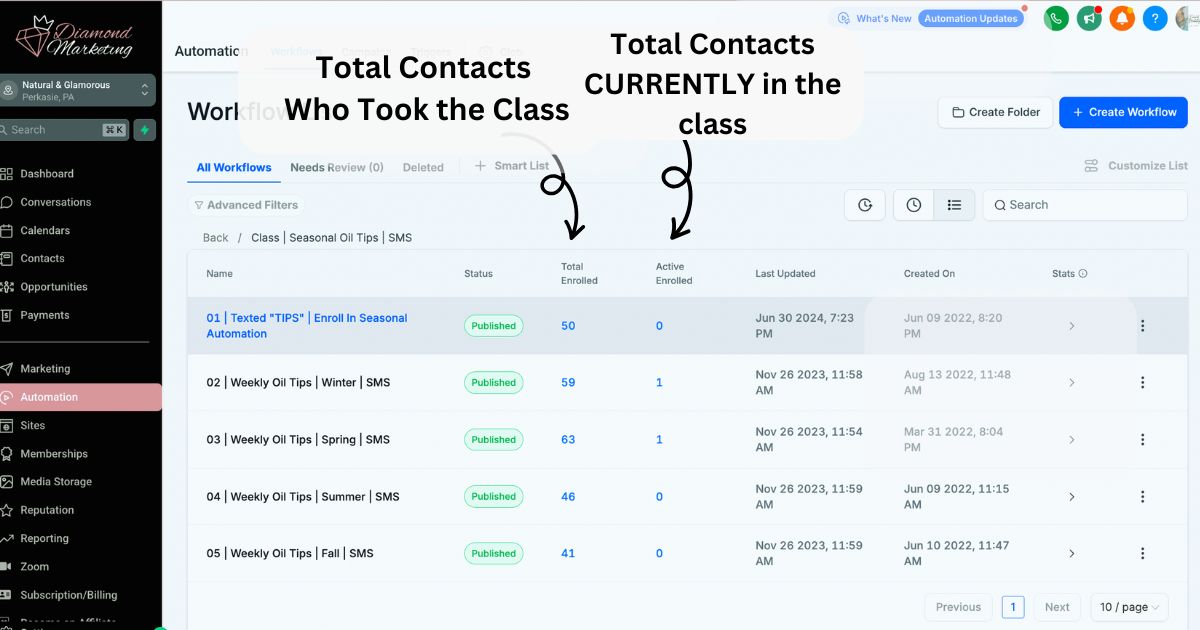
The Automations Tab allows you to track and manage contacts within your workflows effortlessly. From within the workflow list, you can:
Quickly View Contact Counts – See the total number of contacts who have ever entered the workflow, as well as the number of contacts currently active within it.
Open Class Folders – Easily access your class workflows, which include two parts: the CONFIRMATION workflow (welcome message) and the CLASS workflow (content delivery).
Monitor Enrollment Numbers – View real-time enrollment data for each workflow to track engagement and optimize your follow-ups.
Manage Contacts Within Workflow Actions
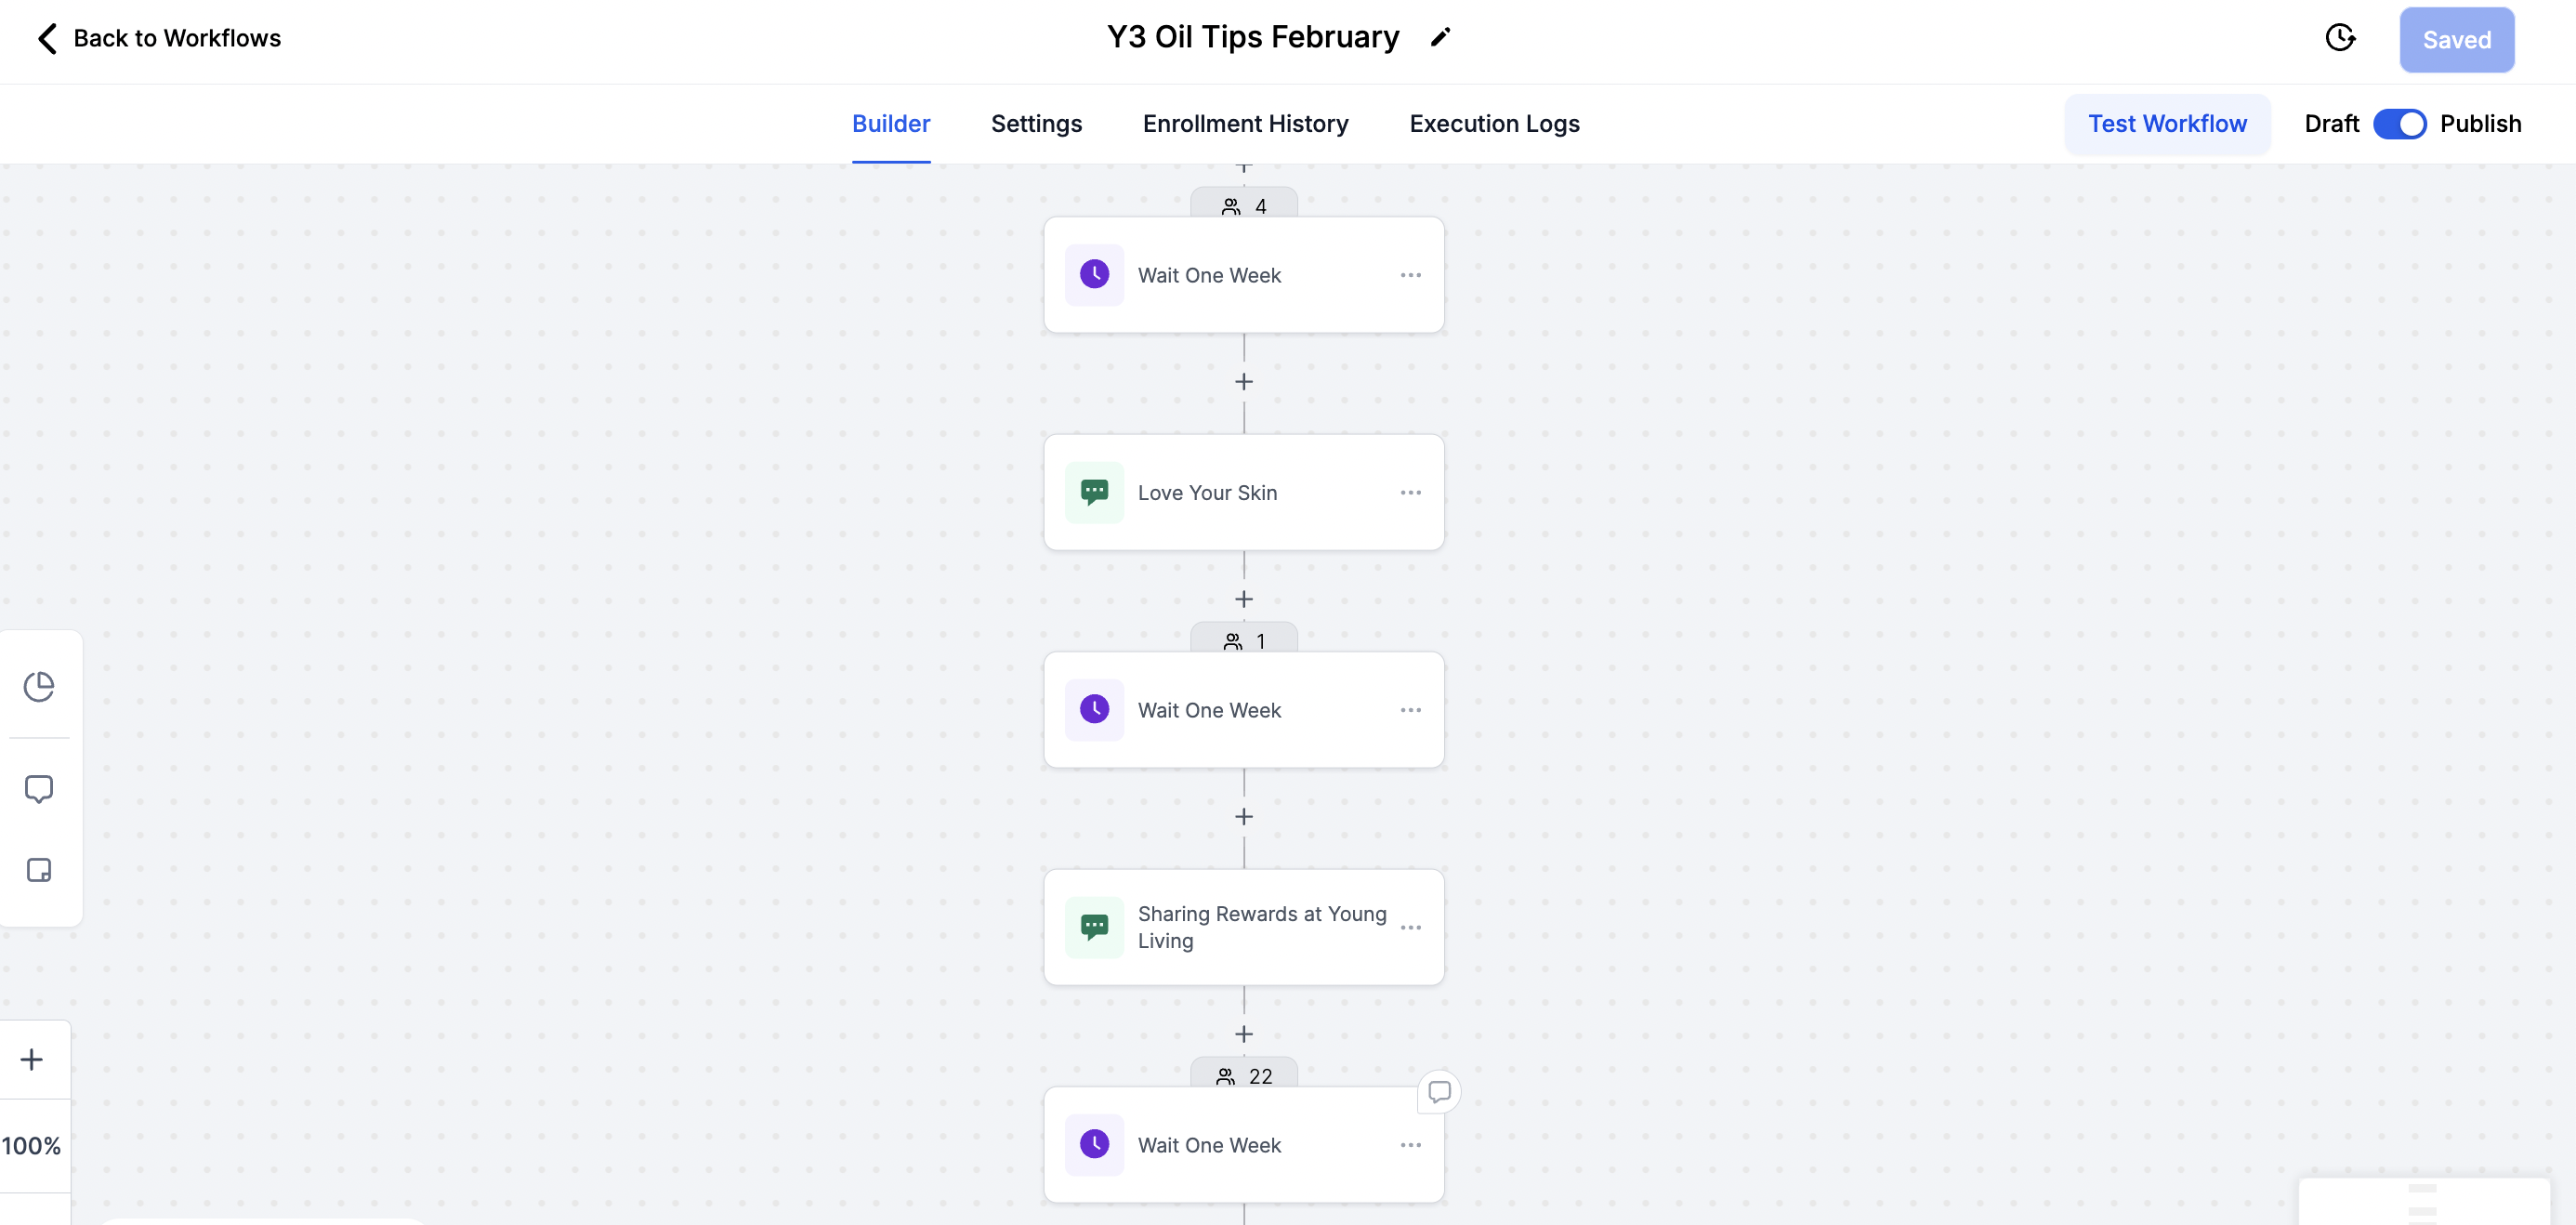
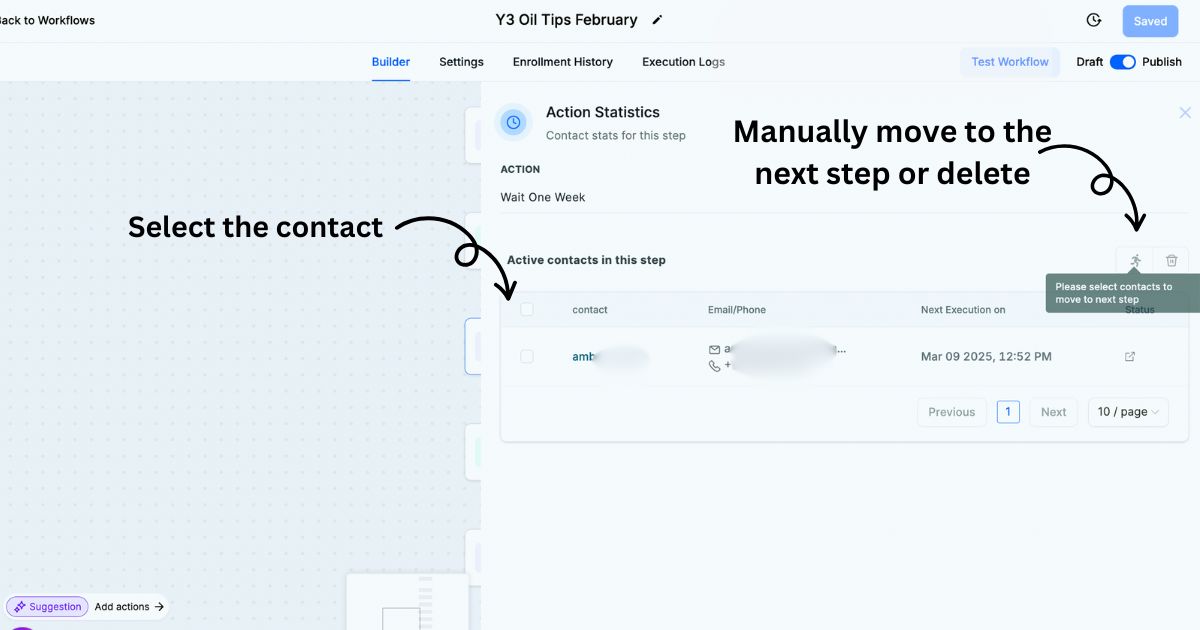
Once inside a workflow, you can easily manage contacts at each step of the process:
Contact Tab for Each Action – At the top of any workflow step with active contacts, you'll see a Contacts tab. Click on it to view the list of contacts currently in that step.
Manually Move Contacts – Need to advance someone sooner? Select a contact and push them to the next step early.
Remove Contacts from a Workflow – You can manually delete contacts from the workflow with just a few clicks.
Download the Lead Connector App
Download Lead Connector + Use Your DM log in to see your Conversations, Contacts, and Calendars right from your cell phone.
You can have individual conversations via email, text our social media! (Social Media Integration is included in our Leader & Mentor Plans only)

Save These Resources!
Guide to Start: Save this page. *Find this guide inside DM on the left menu under 'Become an Affiliate'!
Training Course: Access the Course Here
Join the Facebook Group here
See the Content Included here
Diamond Marketing is a customer care platform design for Young Living Brand Partners. All content provided by Diamond Marketing is the property of Diamond Marketing App LLC and cannot be copied or redistributed outside of Diamond Marketing. without prior consent.